A while back I alluded to this project in an Instagram post. Took me long enough to actually post about it, huh? 😉
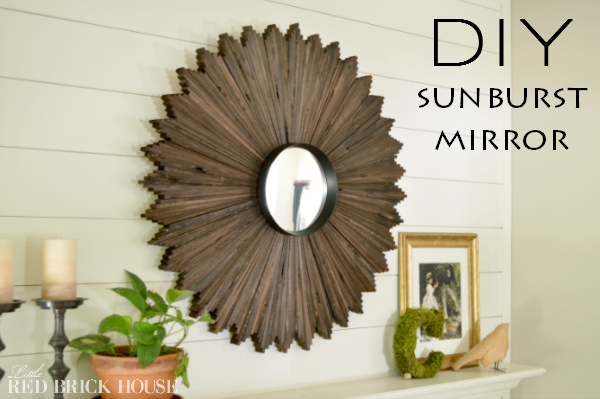
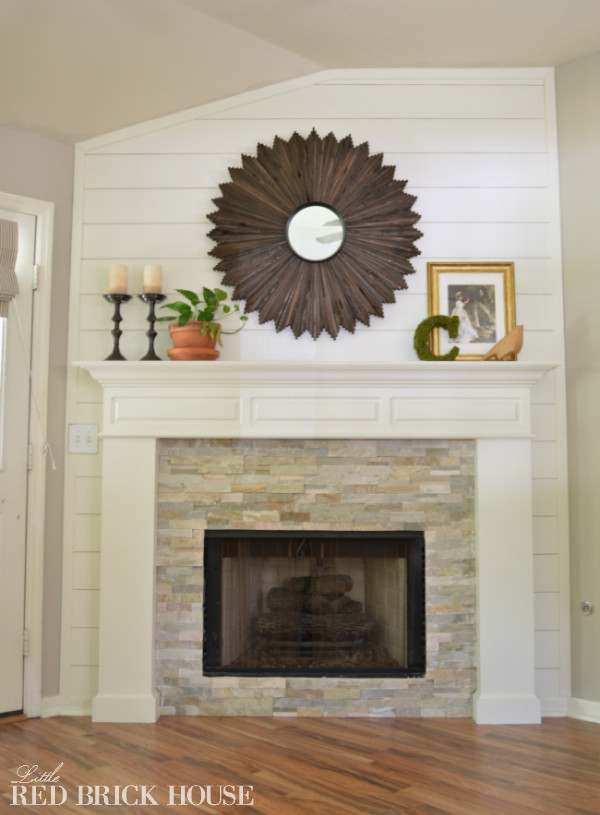
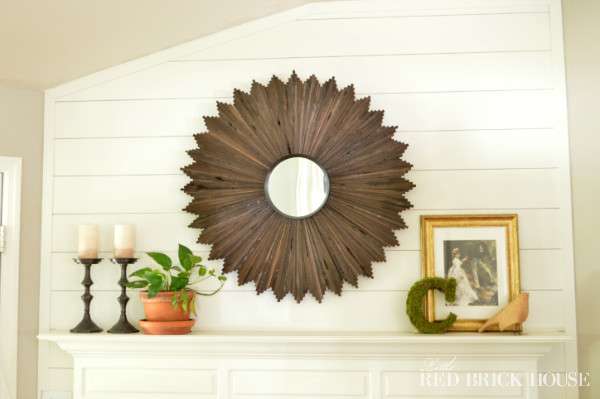
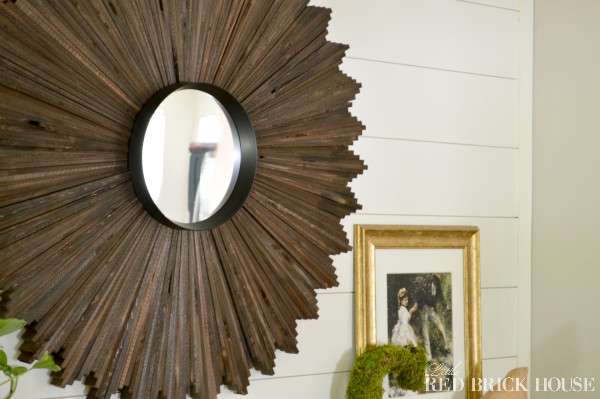
I know that sunburst mirrors are SO three years ago, but I love them and think they are still totally cool. There are many ways you can make a sunburst mirror but I like this spin on the traditional look where the wood shims are turned sideways and staggered at different heights.
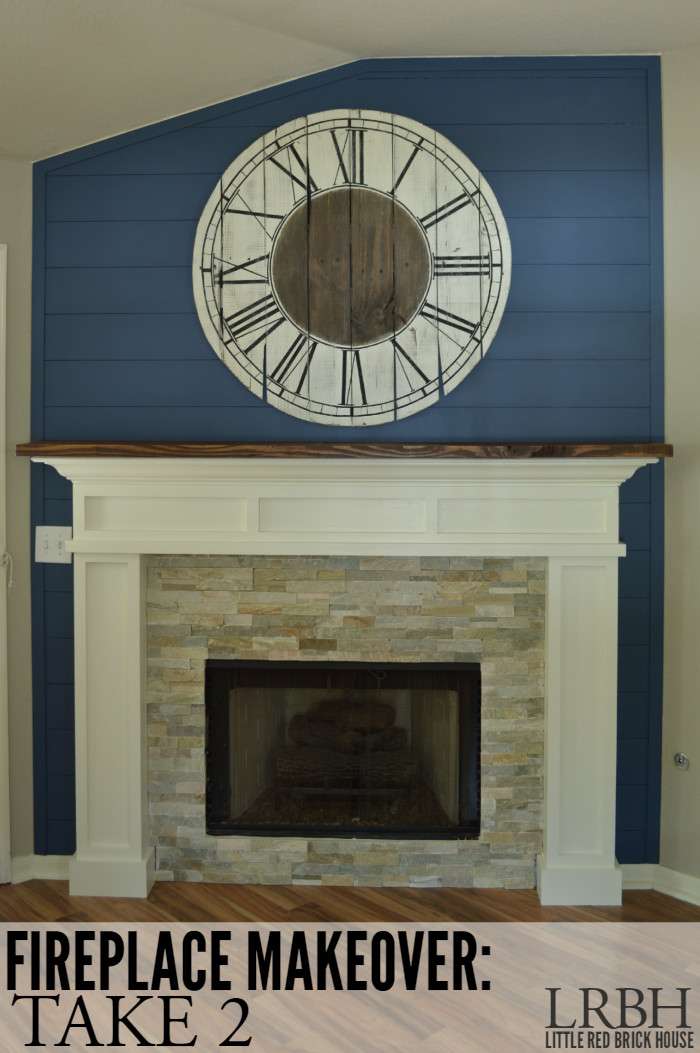
I originally had another idea of what I wanted to place above the fireplace mantle but that project ended up being a little too much white on white and I wanted more depth and interest in the space. Let me show you how I made my DIY Sunburst Mirror.
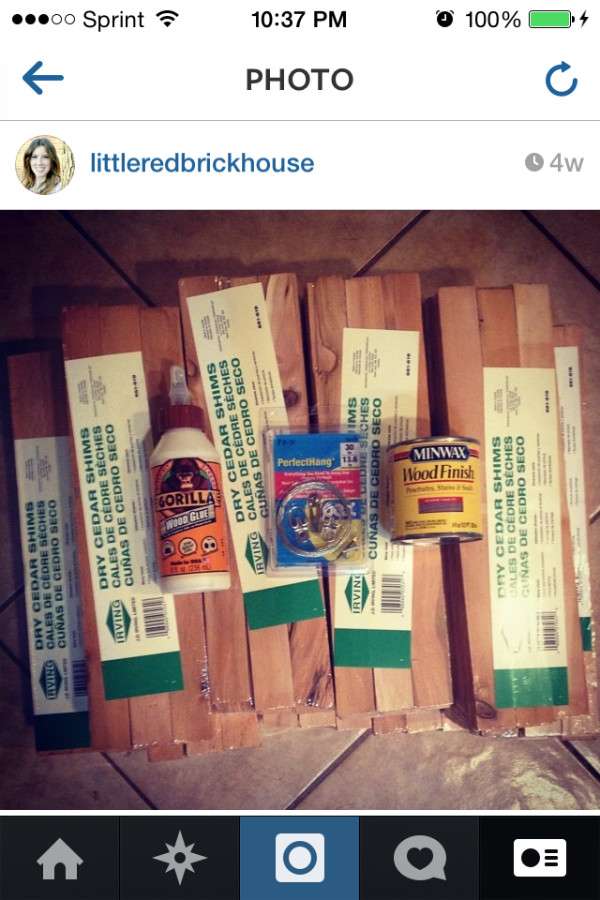
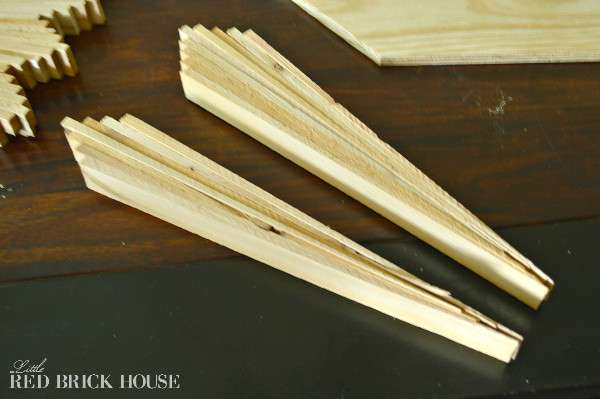
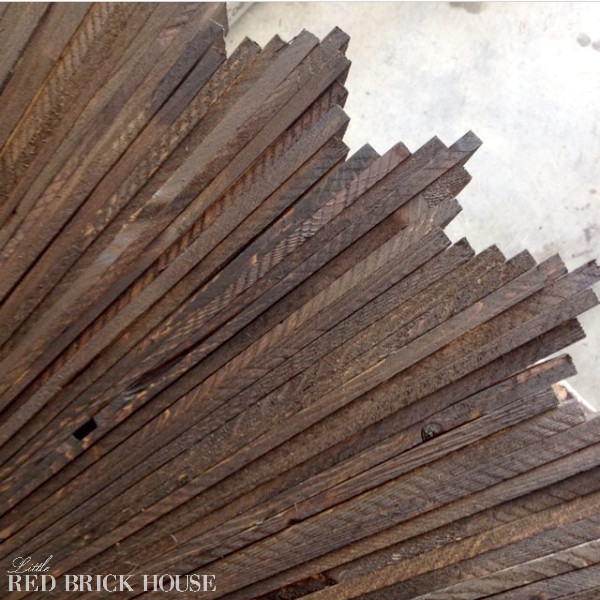
First I made individual sections of shims by staggering and gorilla gluing them together in multiples of seven and nine. I let them sit for twenty-four hours to make sure they set right.
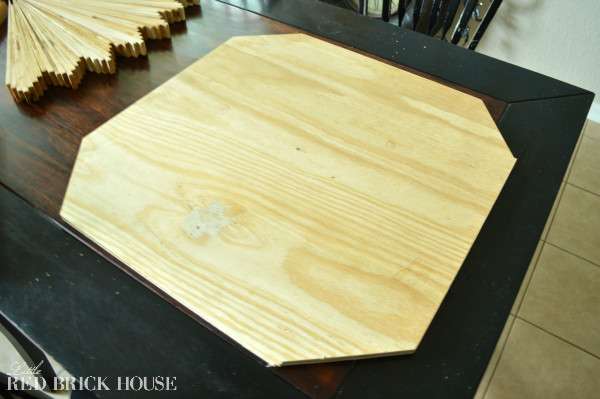
After they were all dried and set, I glued them to a piece of scrap 1/2 inch thick plywood. I alternated the sections by putting a seven count section next to a nine count section and so on. For this part I used Liquid Nails because I wanted to make sure that those shims didn’t end up popping or sliding off the plywood once hung vertically.
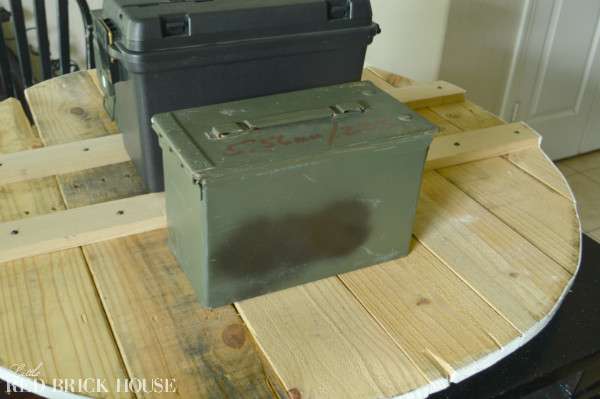
I laid a large flat object (aka an upcoming project) on top to help disperse the weight from the ammo boxes that were used to weigh the mirror down. I needed something heavy and they happened to be the first thing I thought of. Ingenuity at its finest.
Next I stained the piece with my favorite stain of choice, Dark Walnut by Minwax. I loooooove this color. I didn’t bother to seal the stain with poly or wax because it won’t be getting any wear and tear since it will be hanging on the wall.
For the mirror I chose to use is no longer in stock at Target, but this is a similar round, black framed mirror. I love how the mirrors aren’t just a flat piece of glass but have a nice thick rimmed frame around them. I think it adds some great dimension. I already have some ideas for how to use the others in the set. 😉 I glued that down using the Liquid Nails and ammo box weight method from above.
After that sat for twenty-four hours I was ready to attach my mounting hardware. The hubster picked up this handy picture hanging kit which was super easy to install. You just screw in the D-rings, thread and tie the wire through each ring and then hang! See? Simple.
I was really hesitant about nailing anything into the wood planked wall because I had spent so much time building it. But as luck would have it, I found some long, skinny-ish nails that fit perfectly in between the planks and sank deep enough into the wall to hit the studs. So no damage was incurred while hanging. Hallelujah! It was a win-win. I ended up using two nails instead of the mounting nail that came with the kit since it sits at an angle and would have damaged the planks. Plus I figured two nails were better than one. Seems logical, right?
The only thing left to do was to have my hubby hang that bad boy. It’s light enough to where I can lift it, but not exactly over my head whilst trying to strategically place it on the nails. Sometimes you just have to let the men feel manly and do the heavy lifting.

What do you think? Are you still a fan of sunburst mirrors? Or have they passed their prime?
P.S. Be sure to stick around for Friday’s post! I promise you DO NOT want to miss it!
I know this is a million years later (in internet years, at least ;). Any chance you know roughly how much it weighs? I was looking to make something similar to hang outside but need to make sure the frame can hold it! 🙂
Thanks!
Hi, Gina! It’s pretty heavy. I would say about 30 pounds. I can lift it but it definitely takes a little muscle.
Beautiful project! I love dark walnut! It’s one of my favorites as well. I love this version of the sunburst mirror, it has so much depth and looks great above your mantel. Thanks for sharing!
Shonee
Thank you so much, Shonee!
I love your DIY Sunburst Mirror…I may have to make another one like yours 🙂
Thanks so much, Kim! Go for it! 🙂 I am so happy with how it turned out!
Oh wow! This is truly brilliant! It came out beautifully!
Popping in from your Think and Make party! 😉
Thank you so much, Ursula! And thanks for stopping by Think & Make Thursday. Hope to see you there next week! 🙂
I love this mirror. I have debated ordering from Ballard but you have inspired me! Beautiful!
Thank you, Becki! Go for it! It’s really not as hard as it looks. Just a lot of waiting for glue to dry. You will LOVE it!
Wow! This is amazing. I love the “twist” you put on the wood shims. Very very cool. Pinning for future! 🙂
Thank you very much, Kimm! I appreciate it! 🙂
I LOVE me some wood shims and although I’ve seen wood shim mirrors before, I have never seen one as freakin’ beautiful as yours! It’s pure perfection! <3 <3 <3
In fact, you are being featured at The Makers Link Party this week! I hope you will stop by to grab a button and link up with us again! Have a great day!
~Katie @ Upcycled Treasures
Thank you so much, Katie! You are way too kind! Stopping by to check out the other features and grab a button! Thanks, again! 🙂
I love it. Call me crazy…but I think sunburst mirrors are timeless.
Thank you, Trish!
adorable. I am redoing a bedroom and I think this will look great. Need something a little generic, not masculine or feminine. Dark color fits the bill.
Thanks, Vicky! I agree, this color is very universal. Good luck on your bedroom!
Love how you said that they are so three years ago! lol. I love them as well and I ADORE the one that you made. Thanks for linking up to the DIY’ers!
Ha! Ha! Thank you so much, Ashley!
Star burst mirrors are classic and never go out of style. I love yours because it looks a little rustic. My only pressing question is how did you keep Gorilla Glue off your finger tips and if you couldn’t, how did you get it off? That stuff is amazing but it never fails that I get some on me! Beautiful project!
LOL! I have no idea how I kept it off of me. Maybe a little bit of luck. 😉 I’m usually horrible with things like that. You should see my hands after staining a piece. Yikes! Thank you so much for stopping by and for your sweet words, Cajun.
Holy smokes that’s amazing! Thanks for sharing your tutorial on Merry Monday. Pinned.
Thank you, Erlene!
No way,this is so awesome, super cute!!! Pinning and featuring later today 🙂 Thanks for linking up to Inspire Me Monday.
OX
Kristin
Oh my goodness! Thank you so much, Kristin! You have no idea how much I appreciate it! 🙂
Found you through the Show Me Whatcha Got linky party – and I’m so glad I did!
I don’t care what anyone says, sunburst mirrors are a classic imo 🙂 And this one is a stone cold stunner – love the dimensional center mirror and the contrast between the dark mirror and light wall. Excellent job, m’dear!
Thank you very much, Sarah! You are too kind! Thanks for stopping by!
I really love what you did! What a great mirror you DIY-ed!♥ Pinning!
Oh, thank you so much, Aniko! I appreciate it very much!
I love this so much! I’ve always been a fan of sunburst mirrors and I think they’re still totally cool. What a great idea to use the wood shims! I love the color stain you chose. Great project!
Thank you so much, Natalie! Glad you stopped by!
I love this!! That stain is perfect, the staging is perfect, and it’s the piece de resistance that makes your whole mantle pop! Love!
Thank you, thank you, thank you, Erica! You’re so sweet!
I really like how this turned out! I will be featuring it over at Hawthorne and Main for my favorite things Friday.
Thank you SO much, Shonee! You are so incredibly kind. I will be sure to check out your post on Friday!
What?! GIRL! This is so incredible! I was thinking it was some really expensive piece from Pottery Barn or something and here you MADE it. Amazing. I bow down to you, the queen of DIY. 🙂 Thanks so much for sharing your incredible project, Sarah! Have a great day!
~Abby =)
Oh, Abby! You’re making my cheeks hurt from smiling too much! I seriously LOL’d at your comment, though. Thank you for being so kind to me and for all of your support. I really, truly appreciate it. Have a great day, as well!
I am seriously impressed! Thanks for sharing with the Merry Monday Linky Party!
Thank you, Nicole! And thanks for hosting a great party! 🙂
This is beautiful Sarah and I’m still so into sunburst mirrors! I love how different this one is and the edge of it is amazing! Thanks for linking up at The Makers! We love having you 🙂
Thank you so much for your sweet words, Corey! I love partying with you at The Makers! Thanks for hosting!
Amazing! I am definitely pinning this one!
Oh, thank you so much, Jessica! I appreciate it!
I really love your sunburst mirror! A lovely addition to your mantle!
Thank you, Mom! I love you! 😉
Beautiful mirror Sarah. Very creative. Thanks for sharing!
I found you over at homecoming link party!! I still love sunburst mirrors!! As a matter of fact I still haven’t DIY’d one yet but still will…even if it’s 2 years from now! I could never get tired of them!
Yours turned out so pretty!! I love the dark walnut stain!
Following on blogloving, twitter and pinterest 🙂
Thanks for stopping by, Selene! Maybe we can keep the trend alive, LOL. 😉 And a big thank you for following!
Love this! Great job! I love sunburst design 🙂
Thanks, Meg!
Holy goodness – this is FANTASTIC! I would have never in a million years guessed that as a DIY. You did an awesome job … so talented! xx, b @being-bianca.com
Thank you so much, b!
Love the mirror. I am still in love with these mirrors and have the supplies to make one, I should probably get that finished… Great work!
Thanks, Megan! DO it! I promise you will love it. And it’s not nearly as difficult as it seems. 🙂
I love this! I think they are still totally in and it looks great where you hung it 🙂
Thanks, Bre! Glad I’m not behind the times, LOL!
Love this, Sarah! It looks perfect on that fab fireplace wall!
Thank you very much, Amy!
This is just lovely. I, too, have these same supplies waiting in the wings for my d.i.y. touch. I love this look so much!
Thank you, Christine! We’ve got to be prepared for when creativity strikes!
Sarah, this is incredibly beautiful! I cannot get over it. I seriously am in love and want one for my home. You are SO TALENTED!!!!!! – Bre
You’re going to make me blush, Bre! LOL! Thank you so much.
Great work, Sarah. This looks beautiful. If these mirrors did go out of style, I’m sure that when everyone sees yours, they’ll be back. You’re such a trendsetter 🙂
Well, thank you very much, Shanae!
This looks amazing! Love it!
Thank you, Emily! 🙂
I must admit that this is the CUTEST and awesomest DIY sunburst mirror I have ever seen! You go , girl!! 🙂
xox, Crystelle
CrystelleBoutique
Thank you so much, Crystelle! You are so kind!
I have a thing for sunburst mirrors. Totally adore them. 🙂
Me too, Marie! Thanks for stopping by!
Sarah, I love this! You did a fantastic job! Love, Love, Love!!!
Thank you, Tara! I truly appreciate it.
Wow, that is stunning! I love your method, it adds so much depth to the piece. I guess I’m late on the trend too, I’m contemplating making a mirror as well. Bonus, I have lots of inspiration when I do create mine.
Just found your comment in my SPAM folder. What!? Thank you so much for your sweet words. You should totally make one! You will love it!
I’m always doing things three years after they are popular just to make sure that I still like it. Oh, and because I’m slow. Lol!
I love how your mirror turned out. It’s perfect!
Thank you so much, Sarah! You have a really good point about making sure you like it. 😉
Gorgeous!!! This is one of the BEST DIY starburst mirrors I’ve seen!!! I love it!
Oh my gosh, Christina! Thank you! It really means a lot to me. 🙂
Beautiful job, Sarah! Tasteful and classic. Pinned 🙂
Thank you so much, Meegan! You are amazing!
This looks awesome! Love it!! Looks like it would be hard work! Great job
Thank you, Nicole! It was pretty easy, just time consuming. The hardest part was being patient, LOL!
Love this! I tried the exact same thing last year and mine kept falling part! Yours turned out great and I love it hanging above your fireplace! Thanks for linking up to Your Designs This Time!
Thanks, Katie! I was so scared mine would do the same but it’s hanging on okay so far! Congrats on your hostess gig at Your Designs This Time!
Hey girl! I’m featuring your incredible project on my blog today. It’s also one of my features for Your Designs This Time link Party and will appear on all five of our blogs this monday! Have a great weekend 🙂
Holy moly, Katie! Thank you SO much! How exciting! Eeeee!
I wouldn’t of know where to begin on a project like this, but you made it look so easy. I think even I can make one of these mirrors! I love it!
Aww! Thank you, Alana! My hope is to show others that they CAN tackle these projects. So give it a try and let me know when you do! 🙂
What a great project and so inexpensive, thanks for sharing and I am still completely in love with starburst mirrors!
Thanks Jillian! Glad to know I’m not the only one!
WOWZA! This looks soooo good! I love it!!
Thanks, Leigh Anne! Took me long enough. LOL!
LOL! That’s how it goes!
Oh, the life of a DIYer! 😉
Your starburst mirror is beautiful and SO creative! We really are so impressed with your talent.
Happy creating,
Vicki and Jennifer
2 Bees in a Pod
Thank you so much, guys! Y’all are so sweet and I sincerely admire your work! Hope you have a wonderful week!